Quantcast
Channel: xda-developers - Nexus 10 Android Development
Viewing all 98 articles
Browse latest View live

[Guide] Building from sources [Kernel only for now]

$
0
0
Hello everyone.

This guide will help you in building a kernel from source for your Nexus 10

Later, when 4.2 hits AOSP, i'll add a guide for building that too :)

You will need a computer running Linux / OSX to build the kernel, natively, or via a VM.
This guide assumes you’re running any Linux distro.

Getting a toolchain:
You need a toolchain to build the kernel.
The preferred one is Google’s toolchain, the same they use to build AOSP.

In a terminal, type:
Code:

git clone https://android.googlesource.com/pla...droideabi-4.6/
export PATH=$PATH:$(pwd)/arm-linux-androideabi-4.6/bin
export CROSS_COMPILE=arm-linux-androideabi-

TIp: paste the export statements in your ~/.bashrc to have them exported each login.

Getting the kernel source:
The kernel source for Nexus devices is available from Google’s servers.

Source : https://android.googlesource.com/kernel/exynos
Github Mirror: https://github.com/chirayudesai/android_kernel_exynos

Open the terminal, and type the below commands to get the kernel source on your computer.

Code:

mkdir -p android/kernel
cd android/kernel

For Nexus 10, we get the exynos kernel sources.
Next, we change our directory to the newly fetched source.

Type
Code:

cd exynos
Figuring out what to build:
Now, we need to figure out which revision to build.
You need to be exactly sure about this, otherwise there are chances that the compiled kernel won’t work.

The commit to build upon can be found by a few ways.
To get the kernel sources matching the device tree, type the below in the device tree.
Code:

git log kernel
Then type the below in the kernel tree
Code:

git checkout <commit>
The commit of the version running on the current review units is 52f6ab1 (probably), which is same as branch android-exynos-manta-3.4-jb-mr1-fr .

Compiling:

Name of defconfig: manta_defconfig

cd to the directory of the kernel source, then type the below in a terminal.

Code:

export ARCH=arm
export SUBARCH=arm

Code:

make <name_of_defconfig>
make

The kernel image will be ready at arch/arm/boot/zImage

To flash it, you need to make it into a boot.img, more on that later. when we have more sources.

[Mandatory] Rules for Dev-Forum

$
0
0
THIS FORUM IS ONLY FOR RELEASING AND DEVELOPING ROMS AND KERNELS.


SOME GUIDES REGARDING FLASHING WILL BE ALLOWED BUT "COLLECTIONS", "REFERENCES" AND "LIBRARIES" BELONG IN GENERAL SECTION.
  • Try to keep the development forum CLEAN! No offtopic posting and no questions.
  • Use the report button in an offending post to let us mods know we need to take action. Dont take matters into your own hands!!!
  • Sources need to be posted for all kernels!!!
  • You need to use TAGS like [ROM] or [KERNEL] and so on as used in all dev forums throughout XDA
  • Any disputes between developers should be handled by pm. No public posting in a dev thread regarding these matters
  • Rom issues should be discussed within their respective threads
  • Thread titles should ALWAYS coincide with ROMS ALREADY AVAILABLE FOR DOWNLOAD!!! No advance notification of incoming ROM through thread title. A changelog for the yet unreleased Rom can be included in the OP or in another post CLEARLY MARKED as EXPECTED CHANGELOG
  • Posting in the development section means automatic ACCEPTANCE of the above Rules
All posts that are NOT about ROM development, or development in general will be closed or deleted and posters that will choose to disregard the previous guidelines will be infracted.


Thanks!

[Recovery][Obsolete]ClockworkMod Recovery 6.0.1.5 (Updated 11-16-12)

$
0
0
Now that the official Nexus 10 ClockworkMod Recovery 6.0.1.6 images have been released the recovery images are obsolete, thanks to everyone has tested the images I released, and all the feedback :)! The official recovery images can be found here.

Here is Clockworkmod Recovery 6.0.1.5 (Non-Touch) and 6.0.1.5 (Touch) for the Nexus 10 :cool:! I extracted the stock recovery.img from the Nexus 10 Factory Image then ran it through clockworkmod builder.

Update: Hopefully fixed recovery.fstab mount points that were causing reboots when accessing "Mounts and Storage" options.

It can be downloaded from here:

Non-Touch Version

https://docs.google.com/open?id=0B1S...FgyeHhGQ0Z0cEk

Touch Version

https://docs.google.com/open?id=0B1S...nNpMW9Sc0RSU0E

This has not been tested yet on an actual device I need testers willing to test the recovery image and report back there findings!

It can be tested by flashing the recovery using fastboot to avoid bricking your device if it doesn't work use the fastboot boot command only flash it when it has been thoroughly tested!

Code:

fastboot boot recovery /path/to/<recovery>.img
fastboot reboot

Once again thanks to POORCOLLEGEGUY and all the rest of the XDA news writers for featuring this on the portal on November 15, 2012!

[ROOT](11-17-12) Root Nexus 10 with CWM and SuperSu Zip (Stress Free and Simpler)

$
0
0


Updated 11-17-12: Now that we have a stable CWMR image thanks to damien667 this procedure should be a lot less risky and less stressful!

This is confirmed working but due to the procedure involved is risky! The standard XDA disclaimer applies: I take no responsibility for bricked devices due to the following rooting procedure, no warranty express or implied is given, I will not be held responsible if you mess up your tablet by following this procedure!

You must unlock the bootloader before performing this procedure!

Credits: Kidgoo for testing and coming up with the method, thanks to damien667 for the fixed CWM images, and Chainfire for the SuperSu zip and binaries!

Before you begin make sure you read and reread the procedure and fully understand the directions.

1. Download the CWM-SuperSU-v0.98.zip
2. Download damien667's fixed CWMR 6.0.1.6 touch version of from here
3. Connect the Nexus 10 to your computer
4. Flash the CWMR image you downloaded in step 2 using fastboot

Code:

fastboot flash recovery /path/to/<recovery>.img
fastboot reboot

5. Touch "Install from SD Card" in CWMR
6. Select CWM-SuperSU-v0.98.zip that was downloaded in step 1
7. Let CWM-SuperSU-v0.98.zip install
8. Select "Reboot System"
9. Enjoy your rooted Nexus 10 :D!

To keep your custom recovery installed permanently and not get overwritten by the stock recovery when your reboot your tablet delete the following:

Code:

/system/etc/install-recovery.sh
/system/recovery-from-boot.p

[RECOVERY](Updated 11-17-12) Official ClockworkMod Recovery 6.0.1.8

$
0
0
Here is the official ClockworkMod Recovery 6.0.1.8 images for the Nexus 10 enjoy :cyclops:! Users are reporting these latest images (6.0.1.8) to be stable and bug free.

Credits to Koush for releasing the official ClockworkMod Recovery images

These are safe to flash via fastboot.

Non-Touch

http://download2.clockworkmod.com/re....1.8-manta.img

Touch

http://download2.clockworkmod.com/re....1.8-manta.img

These can be flashed via fastboot using the following commands:

Code:

fastboot flash recovery /path/to/<recovery>.img
fastboot reboot

Once again enjoy :victory:!

How to Root Nexus 10 on Win/Mac/Linux! [Step-by-Step VIDEO Tutorials]

$
0
0
Here's a video tutorial on how to root your Nexus 10 for noobs!

Windows video tutorial:


Mac video tutorial:


Linux video tutorial:


All the files you need in one zip (adb+SuperSU+fastboot+Windows drivers):
http://downloadandroidrom.com/file/N...s10RootNew.zip

Step-by-Step tutorial with photos here:
http://nexus10root.com/nexus-10-root...asiest-method/

Also, if you get stuck on bootloop after unlocking bootloader (This happened to me couple times), do a factory reset in stock recovery to fix:


Thanks to shimp208 for the sideload method and working CWM, ChainFire for awesome SuperSU and to all the developers who are worked on CWM recovery!

[ROOT] Nexus 10 JOP40C image with root

$
0
0
I have added root (su & SuperSU free application) to the stock Nexus 10 JOP40C image (2012/11/10).

To be flashed on a Google Nexus 10 with bootloader unlocked.
From fastboot mode, flash with:
Code:

fastboot -w update Nexus10-image-mantaray-jop40c-rooted.zip
Download from http://www.arctablet.com/blog/forum/...p40c-20121110/

[RECOVERY] TWRP 2.3.2.3 touch recovery [2012-11-19]

$
0
0
The 2.3.2.3 update: full screen theme and decryption support. If your Nexus 10 is encrypted, you'll be able to decrypt the device in recovery using your password or PIN and still be able to perform backups, restore, install zips, factory reset, etc.

Team Win Recovery Project 2.3, or twrp2 for short, is a custom recovery built with ease of use and customization in mind. It’s a fully touch driven user interface – no more volume rocker or power buttons to mash. The GUI is also fully XML driven and completely theme-able. You can change just about every aspect of the look and feel.

Phone look:


Tablet look:


CHANGELOG for 2.3.2.1:
-Updates to fix permissions
-Fix USB OTG on GNex

CHANGELOG for 2.3.2.0:
-Fixes / enhancements to handle the multiple user setup introduced by Android 4.2 (see notes)
-Fixed a bug with deleting a backup with a space in the name
-Added highlights on keyboard key presses

CHANGELOG for 2.3.1.0:
-Unmount system after boot to prevent some status 7 symlink failed errors on zip install
-USB Mass Storage code improvements
-Better handling of mounting storage during boot for some devices
-Fixed a problem with sizes of images (boot & recovery) after resetting defaults
-Fixed size errors during backup for some devices on recovery, etc.
-Fixed a problem with restoring backups when multiple archives were present

CHANGELOG for 2.3.0.0:
-Rebased onto AOSP Jelly Bean source code
-Rewrote backup, restore, wipe, and mount code in C++ classes for easier maintenance going forward
NOTE: backups from prior versions of TWRP are still compatible with 2.3
-ADB sideload functionality from AOSP is included in 2.3, see this link for more info
-Re-wrote fix permissions entirely in C++ and runs in a few seconds instead of a few minutes (thanks to bigbiff)
-Improvements to zip finding in OpenRecoveryScript (should be a lot fewer GooManager automation issues)
-Faster boot times
-Added charging indicator while in recovery (only updates once every 60 seconds)

While this update may not bring a host of new must-have features, this update is a significant re-write of much of the core TWRP code. AOSP Jelly Bean recovery source moved to mostly C++ code and now all of the "TWRP" code is fully rewritten into C++ as well. Now that we've laid this groundwork, we're in a much better position to pull in future AOSP recovery updates as well as implementing more great new features.

Since TWRP 2.3 is based on AOSP jelly bean sources, TWRP now uses recovery API 3 instead of 2. Some zips may no longer work if the developer is using an out-of-date update-binary. This API change should not be a problem on newer devices, but older devices will probably encounter several zips that need to be updated. If needed, you can try using this update-binary that was compiled with current sources. It goes in your zip file in the META-INF/com/google/android folder.

DOWNLOAD:
The fastest and easiest way to install TWRP is to use the GooManager app:
Play Store Link
Direct Download
1) Install GooManager from the Play Store
2) Open GooManager and provide root permissions
3) Hit Menu (or the button with the 3 dots on your screen) and then Install OpenRecovery
OR:
You can find more information and download links on our website!
Direct Download
Turn the device off. Press and hold volume down, volume up, and power until the device boots, then on your computer:
fastboot flash recovery openrecovery-twrp-2.3.2.3-manta.img

BUGS:
If you have found a bug, please consider posting it to our github issues log. It's pretty much impossible for us to keep up with the more than 30 threads that we have for the devices that we "directly" support. If you have a significant problem that cannot be answered in this thread, your best bet is to PM me directly, contact us via our website, or find us in our IRC channel below. If you see someone that's struggling, feel free to point it out to us. We need your help to help us keep track of all of our devices! Thanks!

SUPPORT:
Live support is available via #twrp on Freenode with your IRC client or just click this link.

[ROM+KERNEL] [AOSP] AOSP+ 4.2 - JOP40C - Rooted-Deodexed+OTG+More - 20 Nov 2012

$
0
0
For the most case, this is a pure AOSP (Android Open Source Project) based ROM. I will include a few useful additions and customisations, but this will remain close to AOSP. This is a userdebug ROM built from the latest Android 4.2 AOSP code.

The custom kernel (now part of the main ROM) is built using the latest AOSP exynos/manta source [android-exynos-manta-3.4-jb-mr1]. It is also available as a separate update zip which can be flashed over stock ROMs as well as AOSP based ROMs.

ROM Features:
1. Rooted
2. Userdebug build (completely deodexed)
3. Advanced Power Menu (Reboot, Reboot Recovery, Reboot Bootloader)
4. Includes DRM libraries and binaries
5. Working Google Location services (for Google Now, Browser and other Google apps)
6. Custom kernel (see "Kernel Features" below)
7. UNC patched busybox for CIFS, built using the CyanogenMod config. CIFS is now fully functional with the custom kernel. User restrictions may still cause issues. Removed the toolbox mount symlink so that busybox mount becomes the default mount binary
8. Power Menu controlled Extended desktop (credit CyanogenMod). Enable via Settings > Display.
9. WebView dream/screensaver
10. Excluded OpenWnn (Japanese keyboard), PinyinIME (Chinese keyboard), AOSP Music & AOSP QuickSearchBox from build
11. Only included stock ROM audio files
13. Fix Android 4.2 bug where December is missing from the Contacts Events date picker
14. Quick Setting mod (thanks to @kevdliu for the base code)
- Press to directly toggle WiFi and long press to access WiFi settings menu
- Press to directly toggle BT and long press to access BT settings menu
- Add Volume Tile (Press to display Media Volume slider and long press to access Volume settings menu)
- Add Screen Off Tile
- Add Clock (Press to access Clock settings menu) - added by me

New in Nov 20 2012 Build:
1. USB OTG support (Screenshot) [Important: Read "USB OTG Information" section below]
2. Added all the stock ROM wallpapers

Kernel Features:
1. NTFS (read-only) and EXT3 support
2. EXT4 xattr (extended attributes) and ACL (access control lists) support
3. NFS V3, NFS V4 & CIFS support
4. HIDRAW support (supports non-conformant HID devices, provided the drivers are built in)
5. Logitech Unifying devices support
6. Insecure boot image with adb enabled by default
7. Build using the latest AOSP exynos/manta source [android-exynos-manta-3.4-jb-mr1]

Google Apps Pack Features:
1. Built from de-odexed 4.2 JOP40C Nexus 10/manta factory image
2. Updated Play Store apps as of 20 Nov 2012 (Updated Play Store to 3.10.9)
3. Fixed Google Chrome settings FC
4. Fixed Restore from Google Account (worked for me!!)

Additional Proprietary Features (Part of Google Apps Pack):
1. Swipe Keyboard
2. Photosphere
3. Desk Clock Dreams
4. Google Currents Dreams

USB OTG Information:
1. Auto-mount to /storage/usbdisk
2. Files accessible by all applications, processes and users
3. Currently only works with FAT partitions
4. Due to the new multi-user capabilities, ownership is not being set correctly, so only root (su) can write to the device
5. USB removed notification is persistent

Proposed (Future) Features:
1. Bluetooth AVRCP 1.3
2. Enhance OTG support
3. TBD - Taking requests which will not be too far from AOSP

Know Issues:
None that I know of. :D

Download:
full_manta-ota-eng.cgomez.20112012.zip (GooManager friendly)
GoogleAppsPack-4.2.0-JOP40C-V2.zip

manta-kernel-cgomez.20112012.zip
manta-kernel-stock.17112012.zip

Archive [Older Downloads]

Requirements
1. Unlocked bootloader
2. Custom recovery like TWRP 2.3.2.2+ or CWM 6.0.1.8+

Instruction:
1. Flash the ROM using a custom recovery
2. [Optional] Flash Google Apps Pack using a custom recovery
3. Wipe data/factory reset if you are moving from another ROM
4. Wipe cache/dalvik cache for every update

Disclaimer:
I can make no guarantees that your experience with this ROM will be flawless. If you decide to flash this ROM, remember that you are doing so at your own discretion. I cannot and will not be held responsible if your jelly beans become rotten and your tablet decides implode. I will try to help you to the best of my ability, but beyond that, you stand alone behind enemy lines!! Have fun!!


Support this project:
If you like my work, buy me a beer so that I can pass time while my laptop churns out builds...

Credits:
Google For Android [Source]
Samsung For This Amazing Tablet
Goo.im For Hosting My ROMs
CyanogenMod For The Extended Desktop Mod [Source]
TeamWin For TWRP Recovery
Koush For ClockworkMod Recovery & su Binary Fix [Source]
Kevdliu For Quick Settings Mod [Source]
OpenELEC For Busybox Patch [Source]
Me For Everything Else :p

[ADB/FB/APX Driver] Universal Naked Driver 0.72

$
0
0
Universal Naked Driver 0.72
** Google Nexus 4 Added
** Google Nexus 10 Added
** Google Nexus Q Added
** Google Nexus S Added

32 & 64 Bit Windows 8 / 7 / Vista / XP - Attached to this post!
MD5: 30D25BC073F010CA01178CD6E2C5E4FA

I am happy to release my Universal Naked Driver. This is to allow ADB, Fastboot & APX interfaces to work without installing any package much less multiples packages for users with multiple devices. Yes you can just install them and uninstall right away but why bother?

I was annoyed that I couldnt use my Transformer Prime and Galaxy Nexus without having versions and packages trip over each other. My previous post for the Sensation & Galaxy Nexus was helpful so I thought I would bring to XDA the newest Android driver available from source (which they call 4.0) and make it start talking.


Warning: Uninstall any previous driver package's you may have installed and also manually remove drivers by attaching your phone and going to Windows device manager and right click the entry for your phone and select "Uninstall" on the next prompt make sure to select "Delete the driver software for this device" then hit OK and reboot before installing these drivers

Code:

Google Nexus Devices ADB & Fastboot
Samsung Devices ADB & Fastboot
Asus Devices ADB, Fastboot & APX
HTC Devices ADB & Fastboot

Code:

Windows 8 Instructions

How to Disable Driver Signature Enforcement in Windows 8:

From the Metro Start Screen, open Settings (move your mouse to the bottom-right-corner of the screen and wait for the pop-out bar to appear, then click the Gear icon).
Click ‘More PC Settings’.
Click ‘General’.
Scroll down, and click ‘Restart now’ under ‘Advanced startup’.
Wait a bit.
Click ‘Troubleshoot’.
Click ‘Advanced Options’
Click ‘Windows Startup Settings’
Click Restart.

Enjoy!

[Unroot] How to Unroot Nexus 10! [Factory Firmware]

$
0
0
Here's a video tutorial guide for noobs who want to unroot/unbrick your Nexus 10.


Drivers: http://stockroms.net/file/Drivers/an...usb_driver.zip
fastboot for Windows/Mac/Linux: http://downloadandroidrom.com/file/tools/fastboot.zip
Stock Firmware: http://stockroms.net/file/Nexus10

For Windows, type: (XXX may depend on the stock firmware)

Code:

fastboot flash bootloader bootloader-XXX.img
fastboot reboot-bootloader
fastboot flash radio radio-XXX-XXX.img
fastboot reboot-bootloader
fastboot -w update image-XXX-XXX.zip

For Mac OSX, type: (XXX may depend on the stock firmware)

Code:

./fastboot-mac flash bootloader bootloader-XXX.img
./fastboot-mac reboot-bootloader
./fastboot-mac flash radio radio-XXX-XXX.img
./fastboot-mac reboot-bootloader
./fastboot-mac -w update image-XXX-XXX.zip

For Linux, type: (XXX may depend on the stock firmware)

Code:

./fastboot-linux flash bootloader bootloader-XXX.img
./fastboot-linux reboot-bootloader
./fastboot-linux flash radio radio-XXX-XXX.img
./fastboot-linux reboot-bootloader
./fastboot-linux -w update image-XXX-XXX.zip

*Note – If you do not have radio image, you can skip that one.
*Note for Mac/Linux – If you get permissions error, try “chmod 755 *” before doing all the commands and also try adding “sudo” in front of the commands if you still have trouble.

Step-by-Step guide with photos here

[LINUX] Universal Nexus Linux Toolkit v2.0 (Unlock, Lock, Root, CWM, Factory Reset)

$
0
0
Universal Nexus Linux Toolkit v2.0


Universal Nexus Linux Toolkit is a bash script based program that offers an easy way
to do all you need to do before flashing a custom ROM on your Nexus device.

NOTE: THIS WAS NOT TESTED ON NEXUS 4 AND NEXUS 10. PLEASE HELP ME AND TEST IT. YOU CAN SEE THE CODE HERE.
IT'S WORKING REALLY FINE ON NEXUS S, GALAXY NEXUS AND NEXUS 7.


It works with:

1. Nexus 4 [mako]
2. Nexus 10 [manta]
3. Nexus 7 (WiFi) [grouper]
4. Galaxy Nexus (GSM) [maguro]
5. Galaxy Nexus (Verizon) [toro]
6. Galaxy Nexus (Sprint) [toroplus]
7. Nexus S (worldwide version, i9020t and i9023) [crespo]
8. Nexus S (850MHz version, i9020a) [crespo]
9. Nexus S (Korea version, m200) [crespo]
10. Nexus S 4G (d720) [crespo4g]

With this toolkit you will be able to:

- Unlock the bootloader.
- Flash CWM recovery (Standard or Touch).
- Root the phone.
- Lock the bootloader.
- Flash Google Factory Image. (Not available for Sprint Galaxy Nexus)

DOWNLOAD THE TOOLKIT HERE

Galaxy Nexus Linux Toolkit is Open Source! See the CODE

HOW TO EXECUTE (Must run it with superuser permissions. Example given for Ubuntu):
Please extract the .tgz in the place you want, for example in /home/user
Open a terminal and type the following:
>user@linux: cd "THE PATH WHERE IS THE gnlt.sh FILE"
>user@linux: sudo bash ./unlt.sh
If you extract it in /home/user/unlt, the path to the .sh must be /home/user/unlt
so you have to type:
>user@linux: cd /home/user/unlt
>user@linux: sudo bash ./unlt.sh

Note: If you're running on a 64 bits OS, please install 32 bits libraries.

Here are some SCREENSHOTS::good:


I hope you will find it useful! :laugh:
P.S. Sorry for my English. I'm from Argentina!

[Recovery]Touch Based ClockworkMod Recovery

[modules] cifs.ko, md4.ko, nls_utf8.ko, stock [4.2] 3.4.5-g4e6298b

$
0
0
I have managed to get CIFS working on stock Nexus 10.

It's quite a bit more problematic on the Nexus 10 than normal.

There are 2 main issues to deal with. Newer versions of the Linux kernel require a UNC variable to be passed to them and the current version of busybox doesn't do this. There is a patch out. I have extracted the patched busybox binary from craigacomez's AOSP Nexus 10 rom.
(Check it out here: http://forum.xda-developers.com/show....php?t=1998585 )

The other issue is the multiuser stuff. If you execute the mount command from inside Terminal Emulator (or a script program) it looks like it mounts ok and you can 'ls' in the directory but it doesn't work for Android apps, they just see an empty directory but if you do it via a 'adb shell' it works fine in Android apps. By theory is ADB is outside of the multiuser stuff.

1) Unlock bootloader (fastboot oem unlock)
2) Flash recovery adb flash recovery whatever.img
3) Root device (flash CWM-SuperSU-0.98.zip)
4) Install BusyBox (from the market)
5) Copy md4.ko and cifs.ko to device. The files can go anywhere you like. In this example I will just use the root of the sdcard. Some people like them in /system/modules or /system/lib/modules
6) busybox mount -o rw,remount /
7) adb shell
8) Override /system/bin/busybox with the patched version (maybe move it first so it's backed up).
9) insmod /sdcard/md4.ko
10) insmod /sdcard/cifs.ko
11) busybox mount -t cifs -o username=MYUSER,password=MYPASS,unc=\\\\192.168.1. 1\\storage //192.168.1.1/storage /data/media/0/cifs/Storage

You will need to manually preform the last 3 commands each time you reboot the device from a adb shell.

NOTE: You can probably get rid of the -o flags completely. In theory the patched version of busybox makes the UNC bit redundant. Possibly you can use the stock busybox with the UNC flag and avoid using the patched one totally. I have just included it to be sure.

Make sure you type 'busybox mount' not 'mount', by default they are different binaries. Otherwise you can remove the /system/bin/mount command and make a new one linking /system/bin/mount to /system/bin/busybox.

Possibly there is some way to get the mount working in the multiuser environment without requiring busybox. If you figure it out please tell ☺

Some threads on the issue:
http://forum.xda-developers.com/show...8#post34397868
http://forum.xda-developers.com/show...=733490&page=6
http://www.mail-archive.com/busybox@.../msg17650.html

The modules are for 3.4.5-g4e6298b.

EDIT: I added nls_utf8.ko by request

[ROOT] Superboot - Nexus 10 root solution

$
0
0
Introducing.... Superboot! :)

Superboot is a boot.img that when booted, will root your device the first time you boot (installing su and the superuser APK). No need to flash any partitions, no need to mess around with ADB, no messing with the contents of your data partition, no overwriting the shipped ROM on your device, just boot the boot image using the instructions below and you're done!

APPLY THIS AT YOUR OWN RISK!
  • Superboot r1 - DOWNLOAD - MD5: f53825a2df09277f899b6738b3a059d5
How to use Superboot - Windows, Linux and OSX

- Download the Superboot zip file above and extract to a directory
- Put your device in bootloader mode - Turn off the phone then turn on with the 'volume up' and 'volume down' buttons both pressed to enter the bootloader (as pictured below)
- WINDOWS - double click 'superboot-windows.bat'
- MAC - Open a terminal window to the directory containing the files, and type 'chmod +x superboot-mac.sh' followed by './superboot-mac.sh'
- LINUX - Open a terminal window to the directory containing the files, and type 'chmod +x superboot-linux.sh' followed by './superboot-linux.sh'

Note: If you are using a retail device, you may need to unlock the bootloader first, using './fastboot-windows oem unlock' (or the appropriate version for your machine, included in this zip). Note that the OEM unlock sequence wipes your device, so consider doing an 'adb backup' beforehand if required!

Enjoy! :)

P

[ROM-AOSPA] PARANOIDANDROID 2.99.1 [Android 4.2 Preview] [Hybrid Mode] 23-NOV-2012

$
0
0
ParanoidAndroid for AOSP 4.2
  • I don't have this device (yet), so I am unable to test whether this is working properly. I am looking for a few testers to validate, preferably those with significant experience flashing, recovering, troubleshooting, capturing logcat/dmesg, etc. Previous experience with ParanoidAndroid ROMs would be a plus.


Work in Progress
  • Before you go any further, 4.2 still has a quite a few bugs that need to be resolved by Google.
  • This has not had any testing so far, so YMMV. Please make sure you have backups for anything you don't want to lose.
  • Caution is advised. No promises this will not eat your device and take over your home.
  • Google apps are not official, this is a community hack, we have tested all apps but you could still encounter issues.
  • This is a preview of what is to come. we are working hard to tame 4.2, which brought significant changes and bugs.
  • Do not ask about CyanogenMod features. We will add more features in version 3.x, when we have a 100% stable base.

Installation
  • Update your recovery to the latest version. Pre 4.2 recoveries can mess up your sd card/storage. We recommend TWRP.
  • Download google apps: http://www.mediafire.com/?usudw50yb1iubme
  • Download rom: http://tinyw.in/GaJt
  • Perform a factory reset in recovery, unless you are already on PA 2.99
  • Flash ROM first, then gapps
  • Wipe dalvik & cache
  • Reboot and wait, first bootup can take up to 5 minutes, it will also restart once
  • Enter your Google account info, press home when you encounter the black screen
  • After the quirky bootup (thanks to aosp) is over, the rom should work normally
  • Do not restore system apps, system data and Google apps. This can cause bootloops and other problems due to mismatches from CM to AOSP and Android version 4.1.2 to 4.2

Features
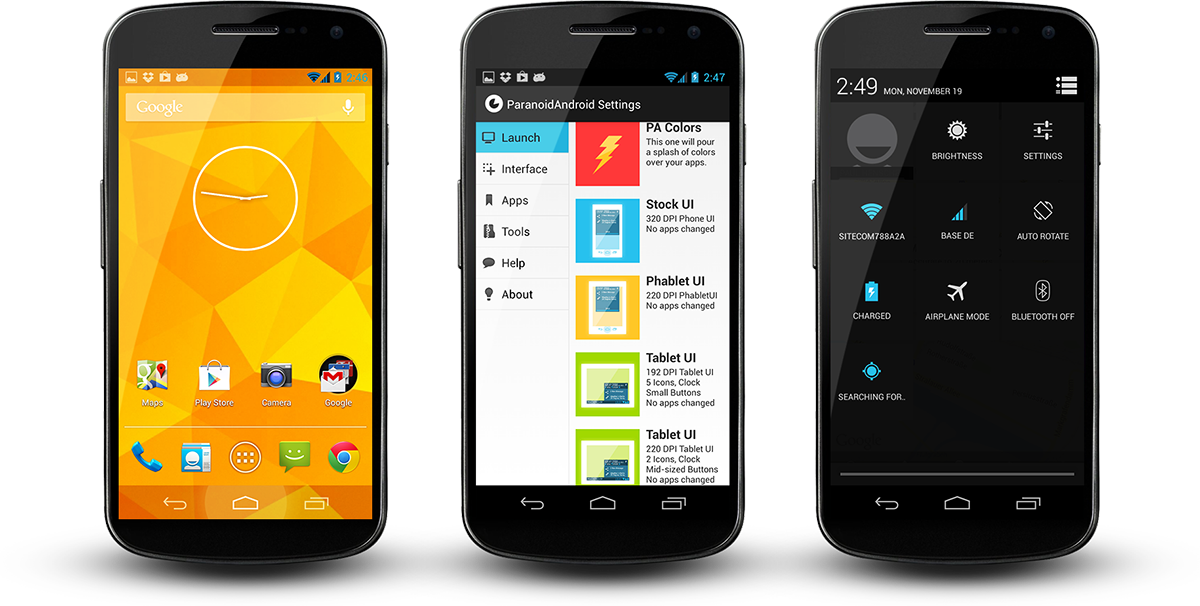
  • Hybrid engine ported, Per App DPI and Per App Layout
  • Tablet UI back from the dead
  • Per app color
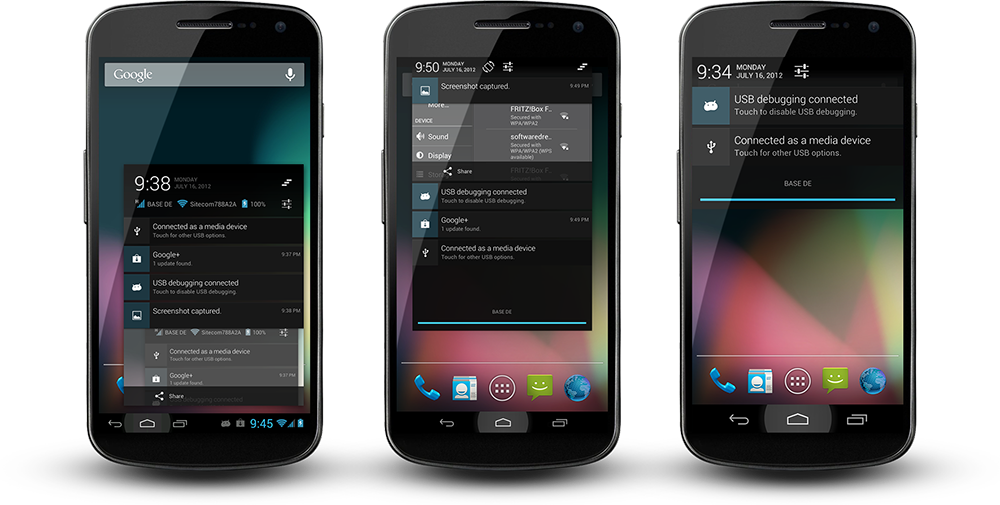
  • Quicksettings -> Quicktoggles (first draft, more to follow)
  • New recents implementation
  • We fixed the aosp lag in the recents view, well, most of it
  • New SystemUI Icons that can cope with transparent bars, thanks go to John Xionidis
  • See through Lockscreen is back
  • Transparent bars + Launcher2 modified to cope with it
  • 4.2 Walls and Sounds
  • Google stock apps
  • Extended Desktop


PER-APP-DPI/LAYOUT
This is not tablet mode! Hybrid engine allows you to target apps individually. You get to pick their actual layouts which can tranform content drastically. Keep in mind, this has nothing to do with build.prop hacks or DPI changes. We list all layouts an app brings, you choose one, its as easy as that. It does not matter if your device runs itself in Phone-, Phablet or Tablet-UI, your apps will always look as you like. On top of that you can scale apps, to fit your screen, that way you can even bring full fledged tablet apps and make them run perfectly. Nothing will break, nothing will shrink, your market will be fine. Additionally we have rewritten many parts of the android framework and fixed countless of AOSP bugs to make way for these modifications - our "tablet mode" runs better on a phone than on a real tablet, that is guaranteed.


PER-APP-COLOR
ParanoidAndroid's newest invention. Define apps in your regular hybrid panel. See your phone fade into the color definition of your current app, press home or go elsewhere and it fades back. Create as many combinations you like, you can even dabble with opacity. This feature is made possible by our hybrid engine, which is unique to this rom.

Quote:

Donations to CM , to D4rKn3sSyS, to moles
Hints
Quote:


[RECOVERY][TOOL]MazWoz Recovery Flasher

$
0
0
MazWoz Recovery Flasher


Windows only, linux tool to come soon...

This is a tool to flash a custom recovery (CWMR/TWRP) on your Nexus 10. It comes with TWRP, but you can easily select any recovery image.

This program is a work in program and will be updated as bugs are found.

Directions
  1. Download and unzip
  2. Plug device in to PC
  3. Boot into bootloader
    • Power down
    • Hold volume up + volume down + power
  4. Run application
  5. Select proper fastboot.exe, adb.exe, and recovery.img
  6. Hit the Flash!!!! button
  7. Follow the on screen prompts
  8. Press Volume up twice and then power to go into recovery


I am not responsible for any damage done to your device. This does void the warranty and I provide none. If you are faint at heart, don't do it. If you are a noob user, I wouldn't recommend it. This is for those that are feeling lazy, but want to flash a new recovery.

HOW To One Click ROOT, Unlock, Install recovery + Unbrick, Unroot, ReLock Video Guide

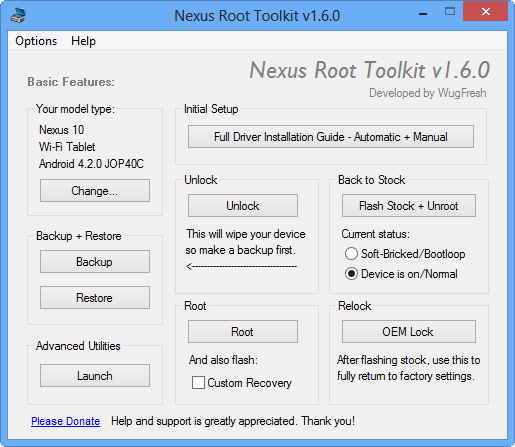
[Toolkit] Wug's Nexus Root Toolkit v1.6.0 [Updated 11/26/12] : Nexus 10 Thread

$
0
0
Unlocking, rooting, relocking and unrooting simplified! (and much more!)

VERSION 1.6.0 - This program will automatically bring together all the files you need to unlock and root your device in a few clicks, or flash it back to stock and re-lock it. You can also use this program to backup/restore all your important data, flash zips, set file permissions, push and pull files, install apps, and much more! With the included file association options, you can perform tasks like flashing zips, installing apps, restoring android backup files, and flashing/booting img files with just a double click! The program includes a full featured interface for automating tasks in TWRP, enhanced restore features, an in-built auto-updater/notification system, ‘any build’ mode, and quick tools utilities. All the latest Android builds and Nexus devices are now officially supported, including the new Nexus 10, Nexus 4, and 3G Nexus 7 (with full 4.2.0 support). The biggest change in this release is the fully web backed system which intelligently and selectively downloads the files it needs and always makes sure you are using the latest files available. Check out the updated changelog for a more comprehensive breakdown of the feature set in this release.

~ my goal for this project is make the entire process as smooth and simple as possible ~


http://www.wugfresh.com/nrt/

{{ WugFresh }}

what is the best rom with the best battery life

$
0
0
Which ROM, if any has the best battery life impact on the n10. And improves the battery.
Viewing all 98 articles
Browse latest View live


<script src="https://jsc.adskeeper.com/r/s/rssing.com.1596347.js" async> </script>